Manage Users
Last update:
iSlash AI provides a unified platform for team message inbox, with role-based access!
To add a platform user, the following information is needed.
Name
Display Name
Email Address
User Group
Step-by-step Guide to Add Users
To get started, add your colleagues and teammates to iSlash AI Platform following the steps below, and iSlash system will send them an invitation email.
Logon to iSlash AI Platform at https://app.islash.io/
Go to to Settings:

At left panel menu, select "Users", then click "+" to add new user.

Fill in the details -
Name : e.g. John Doe
Display Name : e.g. CS John Doe
Email Address : Invitation email will be sent to this email address.
User Group : The user will belong to which group and the permission is under the Groups setting.
2-Step Verification (Optional): If enabled, the user will need to input the verification code from email each time.
Click Save once you have completed filling the details.
Your colleague to check his/her mailbox for a iSlash invitation email and complete registration to get onboard with iSlash AI Platform.
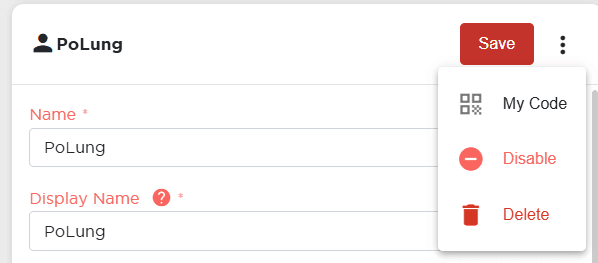
Steps to Delete/Disable a User
Go to Settings > Users, click on the user you want to manage, and find the "Disable" or "Delete" option in the top-right menu.
Congratulations on adding your colleagues and teammates to iSlash AI Platform!
To help your colleagues get started, please share this with them:
Introduction to iSlash AI Chatroom - Team Message Inbox
Your Onboarding Journey continues here:
Creating Groups for Role-Based Permission Setting.
Insights


What should I do when a colleague resigns or leaves the company?
If a team member is no longer part of your organization, you can either:
Disable their user account to keep their data while preventing access.
Delete their user account to free up a user slot and remove access entirely.
What happens when I reach my user quota?
When you’ve reached the maximum number of users allowed by your plan, you won’t be able to add a new user unless you:
Upgrade your user quota by adding more users to your plan,
orRemove an existing user (either by disabling or deleting them) to free up a slot.