AI Node
Last update:
The AI Node processes any customer message using AI and store the output as a variable to power your omnichannel automation flow.
Inside iSlash AI’s AI Agents, this widget/node allows you to use LLMs (Large Language Models) to understand customer messages, extract clean information, classify intent, and generate structured outputs.
Learn more: Introduction to AI Node.
Prerequisites
Before using the AI Node to build an AI Agent, make sure your setup meets the following requirements:
An active iSlash AI paid plan.
Completed channel integration
(WhatsApp Business API, Facebook Messenger, Instagram DM, WeChat Official Account or Website Chat Plugin)
Preparations
Before configuring the node,
Decide what you want the AI to achieve. A clear task ensures better output and more predictable behavior. For example:
Identify intent
Rewrite customer responses
Summarize or classify messages
Validate information
Categorize incoming messages
Decide which branch the customer goes to
(Optional) Knowledge Base Training - if you wish for AI Node to process a message/input according to a set of knowledge/information, please follow this user guide to prepare the knowledge base.
The Key Components of AI Node
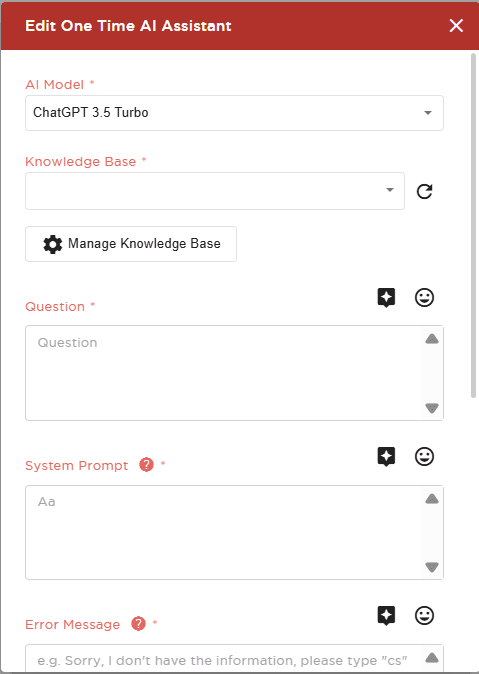
Edit AI Node | Description |
|---|---|
1) AI Model
| Available models in iSlash AI:
|
2) Knowledge Base : The AI Node works as a processor, not a chatbot. It reads an input message and performs a single task. |
|
3) Question* : This is the instruction you want the AI to perform.
| Write it clearly and directly. Examples:
|
4) System Prompt* : The system prompt tells the AI how the output should be formatted.
| This ensures clean, predictable results for your CRM, tags, variables, or routing logic.
|
5) Error Message | - |
6) Send Error Message with Button
| Enable / Disable |
7) Must Answer Based on Knowledge Base
| Enable / Disable |
8) With Chat History
| Enable / Disable |
9) Include sources in the reply
| Enable / Disable |
10) Variable* : AI Node output content will be stored as a system variable, define the name of this variable here. | A variable name cannot include empty spaces. Examples of variable name:
|
Important Note: Question and System Prompt always go hand-in-hand,
for example:Question
System Prompt
“Is this message asking about opening hours? Answer YES or NO.”
“Only output YES or NO.”
OR
Question
System Prompt
“Read $customer_input and determine if the customer is asking about pricing.”
“You are a strict classifier. No explanations. Answer Yes if $customer_input is about pricing, answer No if $customer_input is not related to pricing.”
Step-by-step Guide - Basic Setup
This setup is ideal when you want the AI to process a message once and immediately continue the flow (e.g., rewriting text, extracting intent, cleaning data).
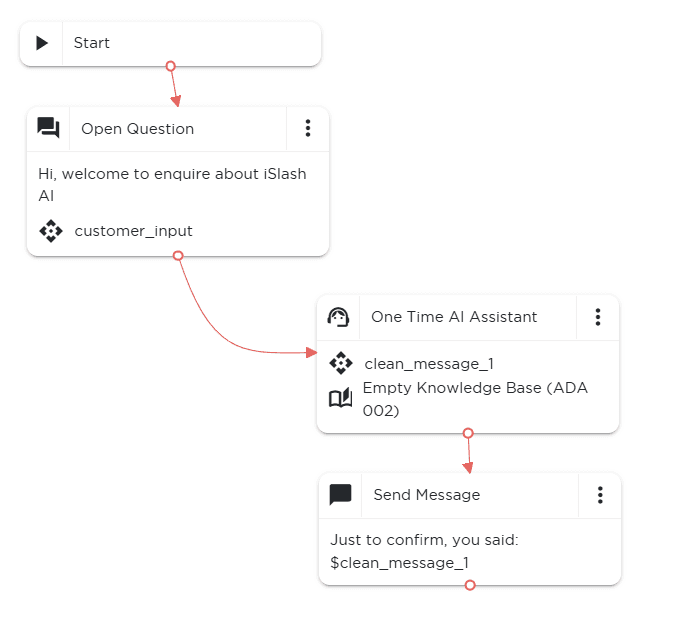
Step 1: Start with an “Open Question” Widget
The AI Node requires input text to process.
Use a "Open Question" widget to collect that input:
Drag and release a "Open Question" widget,
configure and click "Update":
Edit Open Question
Question:
This message will be delivered to usersType:
Define the type of data to be collected, in this scenario, please select "Text".Variable:
Define the name of this variable, for instance: "customer_message"Drag the connecting line from Start → Open Question.
The Open Question widget will capture any free-text message sent by the customer.
Storing the message as data is required to use an AI Node.
✅ A new variable customer_message acquired!
Step 2: Add an AI Node
This node will read the stored text and process it based on your instructions.
Drag and release a "AI Node" widget.
Inside the "AI Node" widget, configure:
AI Model
Knowledge Base (use Empty Knowledge Base)
Question (the task)
System Prompt (output rules)
Variable (for example
ai_result)(Refer to the guide above for detailed configuration.)
When done, click Update.
Drag the connecting line from Open Question → AI Node.
✅ The customer_message variable has been processed and AI Node has produced an output ai_result.
Step 3: Add a “Send Message” Widget
This is where you display or use the AI’s output, in this case we are demonstrating with a simple "Send Message" widget:
Drag and release to create a "Send Message" widget.
Configure the widget by typing in your message.
Insert the AI Node’s output variable (i.e.,
ai_result).When done, click Update.
Then connect AI Node → Send Message.
Step 4: Save the AI Agent.
Click Save. Your Basic AI Agent setup is complete.
This setup is best for:
Rewriting messages
Extracting clean data
Identifying customer intent
Auto-tagging or routing
Storing clean data into CRM
Use Case: Marketing team wants clean answers from customers, even if they reply with typos or slang.
In this step-by-step user guide, we will walk you through setting up AI Node to clean or transform customer messages:
Logon to iSlash AI Platform at https://app.islash.io/
Go to AI Agents and click Create.
Complete the left panel settings,
including Name, Channels, Status, Start Condition and Exit Condition.Drag and release Open Question, connect to Start and update columns:

Edit Open Question
Input Suggestions
Question : input greeting message
"Hi, thanks for enquiring with us."
Type : Test / Media
select Text
Variable : input variable name
“customer_input”
Drag and release AI Node, update columns:
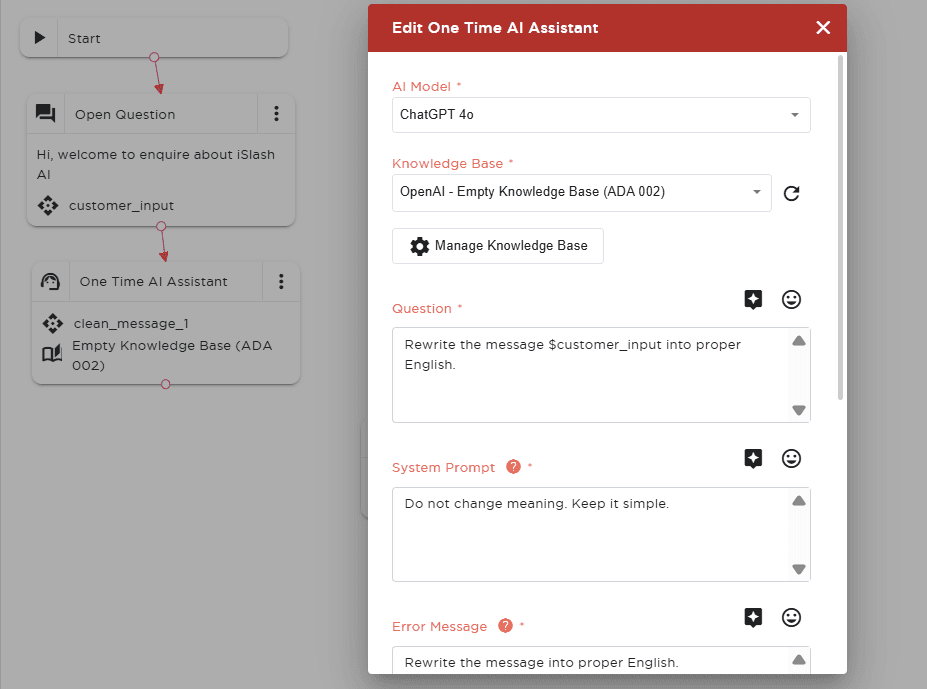
Edit AI Node
Input Suggestions
AI Model :
select ChatGPT 4o.
Knowledge Base :
select “Open AI - Empty Knowledge Base (ADA 002)”
Question : input your intended process
“Rewrite the message $customer_input into proper English.”
System Prompt : provide instruction to AI
“Do not change meaning. Keep it simple.”
Error Message
Send Error Message with Button
Disable
Must Answer Based on Knowledge Base
Disable
With Chat History
Disable
Include sources in the reply
Disable
Variable : customize the output variable name
“clean_message_1”
Click “Update” to save, connect to the widget before.
Drag and release Send Message, input message to be sent.

You will be able to insert the output content by selecting the variable from the variable list.
Click “Update” to save,
connect the AI Node earlier to Send Message.At the top right corner, click Save to complete the AI Agent that is able to process and confirm customer’s message.
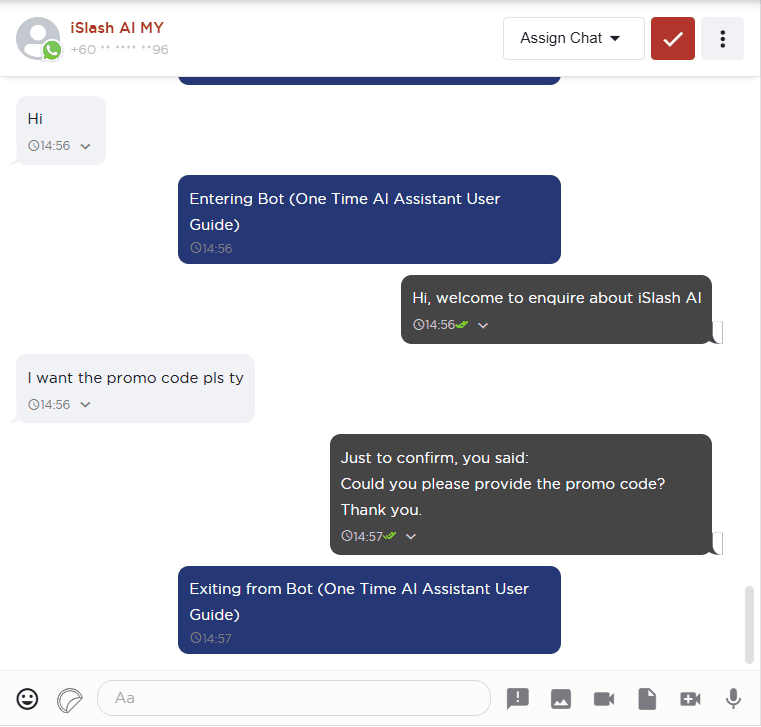
The Results
Customer sends a typo-heavy reply
: “i wan the promo code pls ty”
AI Node rewrites
: “I want the promo code, please.”
Reply to customer
: “Just to confirm, you said: Could you please provide the promo code? Thank you.”
Insights


