Use the AI Node + Condition Flow when you want the automation to go into different paths depending on what the AI detects.
This helps the AI Agent make smart decisions, such as:
Is the customer asking about opening hours?
Is this a complaint?
Is this a sales enquiry?
Is the answer “yes” or “no”?
Should this customer be tagged?
Prerequisites
Before using the AI Node, make sure your setup meets the following requirements:
An active iSlash AI paid plan.
Completed channel integration
(WhatsApp Business API, Facebook Messenger, Instagram DM, WeChat Official Account or Website Chat Plugin)
Preparations
Before configuring the node,
Decide what you want the AI to achieve. A clear task ensures better output and more predictable behaviour. For example:
Identify intent
Rewrite customer responses
Summarize or classify messages
Validate information
Categorize incoming messages
Decide which branch the customer goes to
(Optional) Knowledge Base Training - if you wish for AI Node to process a message/input according to a set of knowledge/information, please follow this user guide to prepare the knowledge base.
Step-by-step Guide
Step 1: Start with an “Open Question” Widget
The AI Node requires input text to process.
Use a "Open Question" widget to collect that input:
Drag and release a "Open Question" widget,
configure and click "Update":
Edit Open Question
Question:
This message will be delivered to usersType:
Define the type of data to be collected, in this scenario, please select "Text".Variable:
Define the name of this variable, for instance: "customer_message"Drag the connecting line from Start → Open Question.
The Open Question widget will capture any free-text message sent by the customer.
Storing the message as data is required to use an AI Node.
✅ A new variable customer_message acquired!
Step 2: Add an AI Node
This node will read the stored text and process it based on your instructions.
Drag and release a "AI Node" widget.
Inside the "AI Node" widget, configure:
AI Model
Knowledge Base (use Empty Knowledge Base)
Question (the task)
System Prompt (output rules)
Variable (for example
ai_result)(Refer to the guide above for detailed configuration.)
When done, click Update.
Drag the connecting line from Open Question → AI Node.
✅ The customer_message variable has been processed and AI Node has produced an output ai_result.
Step 3: Add a “Condition” Widget
Customize flow based on condition, in this application, we are utilizing the Variable condition:
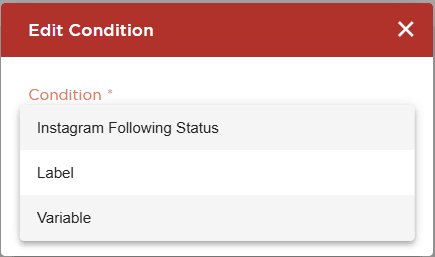
Drag and release a "Condition" widget.
Inside the "Condition" widget, configure:
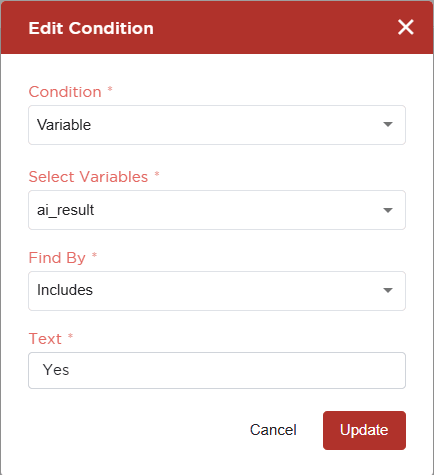
Condition (select Variable)
Select Variables (select
ai_result, or your defined variable.)Find By (Includes / Excludes)
Text (the specification, case sensitive)
When done, click Update.
This "Condition" widget to perform check if the variable includes the defined text:

✅ You have created a node that will perform check and divide the path into Match and Not Match; now we can design the flow following these 2 conditions.
✔ Match Path | ✖ No Match Path |
|---|---|
This runs when the AI answer matches the condition. | This runs when the AI answer does not match. |
Example use:
| Example use:
|
Step 4: Design the following paths and Save the AI Agent.
Proceed to design the following paths, whether to send message or enter another AI Node for processing. Once done, click Save. Your Basic AI Agent setup is complete.